How to configure Zabbix
From time to time you need to know how your server works. Zabbix is a tool that can help to solve this task. Here we tell you how to install and do first configuration of this monitoring system.
We assume that you have installed the base system. We will configure zabbix server, to do it you need to install some packages:
root@zabbix:~# apt install mariadb-server zabbix-server-mysql zabbix-agent apache2 zabbix-frontend-php php-mysql snmpd
It takes some time to complete the action.
After installation you should edit some configuration files.
SNMP
Open its configuration file (/etc/snmp/snmpd.conf) in a text editor and uncomment follow line:
#rocommunity public localhost
This line allows full access from the localhost (but in read only mode). After editing it should look like:
rocommunity public localhost
Save the changes and start the service:
root@zabbix:~# svcs snmpd
STATE          STIME    FMRI
disabled       17:55:37 svc:/network/snmpd:default
root@zabbix:~# svcadm enable snmpd
root@zabbix:~# svcs snmpd
STATE          STIME    FMRI
online         17:55:46 svc:/network/snmpd:default
root@zabbix:~#
The service is works now. You can inspect it, but you need another package (apt install snmp), just type in the command line snmpwalk -v 2c -c public localhost, you will see a big tree of the OIDs.
MariaDB
Zabbix needs a database, here we use mariadb server, let configure it:
root@zabbix:~# svcs mariadb
STATE          STIME    FMRI
disabled       17:45:42 svc:/database/mariadb:default
root@zabbix:~# svcadm enable mariadb
root@zabbix:~# svcs mariadb
STATE          STIME    FMRI
online         18:02:35 svc:/database/mariadb:default
root@zabbix:~#
It works now, now we need to create a database and a new account for zabbix service, let do it:
root@zabbix:~# mysql
Welcome to the MariaDB monitor.  Commands end with ; or \g.
Your MariaDB connection id is 2
Server version: 10.1.26-MariaDB-0+deb9u1+dilos3 DilOS 9.1

Copyright (c) 2000, 2017, Oracle, MariaDB Corporation Ab and others.

Type 'help;' or '\h' for help. Type '\c' to clear the current input statement.

MariaDB [(none)]> create database zabbix character set utf8 collate utf8_bin;
Query OK, 1 row affected (0.00 sec)

MariaDB [(none)]> create user zabbix@localhost identified by 'test';
Query OK, 0 rows affected (0.00 sec)

MariaDB [(none)]> grant all on zabbix.* to zabbix@localhost;
Query OK, 0 rows affected (0.00 sec)

MariaDB [(none)]> exit
Bye
root@zabbix:~#
We created a new database called zabbix (create database zabbix;)
then we created a new local (localhost) user zabbix with the password test (create user zabbix@localhost identified by 'test';)
and the last command gives full access to the new database for the user (grant all on zabbix.* to zabbix@localhost;)
Zabbix Agent
Edit its configuration (/etc/zabbix/zabbix_agentd.conf), the only change you need to do is to uncomment follow line:
# User=zabbix
It should look like:
User=zabbix
LogFile=/var/log/zabbix-agent/zabbix_agentd.log
EnableRemoteCommands=1
Server=10.10.10.80
ServerActive=10.10.10.80
Hostname=con3-1
User=zabbix
Include=/etc/zabbix/zabbix_agentd.conf.d/*.conf
The line tells the service to drop privileges to specified user, by default the service started as root (insecure at all).
And start the service:
root@zabbix:~# svcs zabbix-agent
STATE          STIME    FMRI
disabled       17:45:43 svc:/network/zabbix-agent:default
root@zabbix:~# svcadm enable zabbix-agent
root@zabbix:~# svcs zabbix-agent
STATE          STIME    FMRI
online         18:17:00 svc:/network/zabbix-agent:default
root@zabbix:~#
Now it works.
Zabbix Server
It is more complicated than the agent. Open its configuratiot file and edit it (/etc/zabbix/zabbix_server.conf).
Specify the password to access the database (you did it at database stage, 'test'):
# DBPassword=
By default the password is empty, type here our password, "test" was chosen in this example and the line looks like:
DBPassword=test
Next line which should be changed is DBSocket. By default MariaDB uses different socket file:
# DBSocket=/tmp/mysql.sock
Just specify it here:
DBSocket=/var/run/mysqld/mysqld.sock
Don't forget to drop privileges (as we did it for zabbix-agent)
User=zabbix
Save the changes. Next step is the database. The server requires valid data to start. The package has three files to do it:
root@zabbix:~# ls -l /usr/share/zabbix-server-mysql/*.gz
-rw-r--r-- 1 root root   51203 Dec 21  2016 /usr/share/zabbix-server-mysql/data.sql.gz
-rw-r--r-- 1 root root 1092968 Dec 21  2016 /usr/share/zabbix-server-mysql/images.sql.gz
-rw-r--r-- 1 root root   10690 Jan  6 10:05 /usr/share/zabbix-server-mysql/schema.sql.gz
In this example we use they all. Restore them into the database:
root@zabbix:~# cd /usr/share/zabbix-server-mysql/
root@zabbix:/usr/share/zabbix-server-mysql# ls -l *.gz
-rw-r--r-- 1 root root   51203 Dec 21  2016 data.sql.gz
-rw-r--r-- 1 root root 1092968 Dec 21  2016 images.sql.gz
-rw-r--r-- 1 root root   10690 Jan  6 10:05 schema.sql.gz
root@zabbix:/usr/share/zabbix-server-mysql# zcat schema.sql.gz images.sql.gz data.sql.gz | mysql zabbix
root@zabbix:/usr/share/zabbix-server-mysql#
Now we can start the server:
root@zabbix:~# svcs zabbix-server
STATE          STIME    FMRI
disabled       17:45:44 svc:/network/zabbix-server:default
root@zabbix:~# svcadm enable zabbix-server
root@zabbix:~# svcs zabbix-server
STATE          STIME    FMRI
online         18:40:42 svc:/network/zabbix-server:default
root@zabbix:~#
IT WORKS! ![]()
Zabbix PHP frontend
There are many different ways to use it, we use it by default (as an example), enable the configuration, using a2enconf apache tool:
root@zabbix:~# a2enconf zabbix-frontend-php
Enabling conf zabbix-frontend-php.
root@zabbix:~#
Copy an example configuration to the main place and edit it:
root@zabbix:~# cp /usr/share/zabbix/conf/zabbix.conf.php.example /etc/zabbix/zabbix.conf.php
root@zabbix:~# cat /etc/zabbix/zabbix.conf.php
<?php
// Zabbix GUI configuration file.
global $DB;

$DB['TYPE']                             = 'MYSQL';
$DB['SERVER']                   = 'localhost';
$DB['PORT']                             = '0';
$DB['DATABASE']                 = 'zabbix';
$DB['USER']                             = 'zabbix';
$DB['PASSWORD']                 = '';
// Schema name. Used for IBM DB2 and PostgreSQL.
$DB['SCHEMA']                   = '';

$ZBX_SERVER                             = 'localhost';
$ZBX_SERVER_PORT                = '10051';
$ZBX_SERVER_NAME                = '';

$IMAGE_FORMAT_DEFAULT   = IMAGE_FORMAT_PNG;
root@zabbix:~#
In our example we need to change password only, in your real config you need more changes.
$DB['PASSWORD'] = 'test';
Save the changes and let do the last step, and it is...
APACHE
Enable php module:
root@zabbix:~# a2enmod php7.3
Considering dependency mpm_prefork for php7.3:
Considering conflict mpm_event for mpm_prefork:
Considering conflict mpm_worker for mpm_prefork:
Module mpm_prefork already enabled
Considering conflict php5 for php7.3:
Module php7.3 already enabled
Also you need specify a timezone in the /etc/php/7.3/apache2/php.ini file:
root@zabbix:~# grep date.timezone /etc/php/7.3/apache2/php.ini
; http://php.net/date.timezone
;date.timezone =
The line could look like:
date.timezone = Europe/Moscow
Now start the server:
root@zabbix:~# svcs http:apache2
STATE          STIME    FMRI
disabled       17:45:43 svc:/network/http:apache2
root@zabbix:~# svcadm enable http:apache2
root@zabbix:~# svcs http:apache2
STATE          STIME    FMRI
online         18:58:08 svc:/network/http:apache2
root@zabbix:~#
That's all.
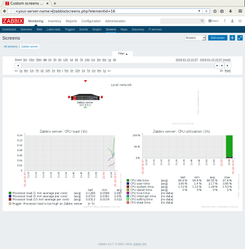
Open your favorite browser and configure it:
http://<your-server-name>/zabbix
and you should see something like this:

Enter the user name and its password (by default it is admin, zabbix)