QEMU is a generic and open source machine emulator and virtualizer. When it used as a machine emulator, QEMU can run OSes and programs made for one machine (e.g. an ARM board) on a different machine (e.g. your own PC). By using dynamic translation, it achieves very good performance.
When used as a virtualizer, QEMU achieves near native performance by executing the guest code directly on the host CPU. QEMU supports virtualization when executing under the Xen hypervisor or using the KVM kernel module in Linux. When using KVM, QEMU can virtualize x86, server and embedded PowerPC, 64-bit POWER, S390, 32-bit and 64-bit ARM, and MIPS guests.
In this article we will run virtual machine with dilos using QEMU KVM hosted hypervizor on Dilos host. This is just an example, any guest os can be use instead (CentOS, Debian etc...). Will use noVNC console for accessing guest OS during the installation.
Pre-requirements:
Configure noVNC e.g. as described on DilOS HowTo WiKi page: How To use noVNC on DilOS
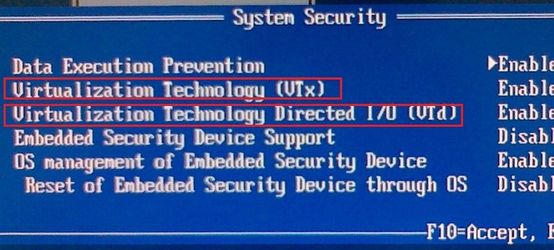
If hosted DilOS OS installed on bare-metal hardware, ensure that CPU Virtualization instructions (VTx/VTd) are enables in BIOS:
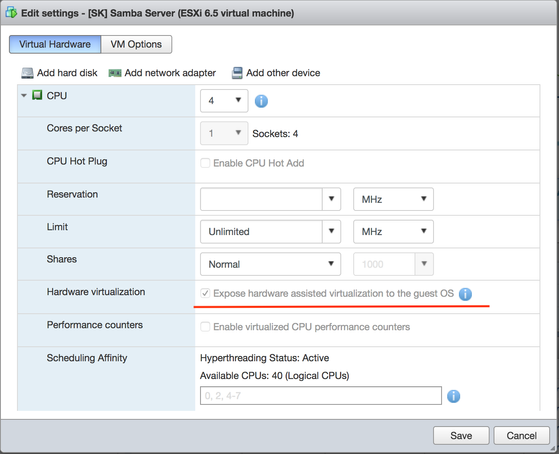
If virtualization platform is used for hosted DilOS VM (e.g. VMware ESXi), ensure that nested virtualization option is ON at properties of this VM.
Installation:
root@dilos:~# apt update && apt install driver-kvm && reboot
root@dilos:~# wget https://apt2.dilos.org/dilos/isos/kvm/smartdc.tar.gz
root@dilos:~# tar xfv smartdc.tar.gz -C /
root@dilos:~# cp /smartdc/share/qemu/bios.bin /smartdc/share/qemu/extboot.bin
Note: During tests, -bios option of QEMU was not working correctly. QEMU is always looking for bios in /smartdc/share/qemu/extboot.bin by default.
root@dilos:~# zfs create -V 16Gb rpool/kvm0
We are ready to run nested VM in QEMU with KVM
root@dilos:~# /smartdc/bin/qemu-system-x86_64 -enable-kvm -smp 2 -m 2048 -boot order=dc \
-drive file=/dev/zvol/rdsk/rpool/kvm0,if=virtio,index=0,media=disk,boot=on,id=disk0 \
-drive file=/root/dilos-2.0.1.22.iso,media=cdrom,if=ide,index=1 \
-bios /smartdc/share/qemu/extboot.bin \
-vnc 0.0.0.0:0,password -monitor stdio
-device virtio-net-pci,netdev=n1,mac=02:08:20:80:8e:d3 -netdev user,id=n1,net=192.168.11.0/24
Where:
-enable-kvm - instruct to use KVM hypervisor module
-smp 2 - swich on the multiprocessor mode with 2 vCPU
-m 2048 - amount of memory to be used with this virtual machine
-boot order=dc - sequence of using boot devices during boot process: here - try hdd fisrtly, then cd-rom.
-drive file=/dev/zvol/rdsk/rpool/kvm0,if=virtio,index=0,media=disk,boot=on,id=disk0 - paramenters for the hdd device where quest OS will be installed
-drive file=/root/dilos-2.0.1.22.iso,media=cdrom,if=ide,index=1 - description of the cd-rom device and reference to mounted .iso image
-vnc 0.0.0.0:0,password -monitor stdio - description of VNC console for accessing this virtual machine: listen on all network interfaces, port 6080.
-device virtio-net-pci,netdev=n1,mac=02:08:20:80:8e:d3 - instruct KVM to use viertio paravirtual driver for network card and set-up described MAC address for ethernet port
-netdev user,id=n1,net=192.168.11.0/24 - indicates the network to be provided to this VM. Network bridge will be automatically created to provide the conenctivity to external resources.
QEMU 0.14.1 monitor - type 'help' for more information
(qemu) Start bios (version 0.6.1.2-20110201_165504-titi)
Ram Size=0x80000000 (0x0000000000000000 high)
CPU Mhz=2613
PCI: pci_bios_init_bus_rec bus = 0x0
PIIX3/PIIX4 init: elcr=00 0c
PCI: bus=0 devfn=0x00: vendor_id=0x8086 device_id=0x1237
PCI: bus=0 devfn=0x08: vendor_id=0x8086 device_id=0x7000
PCI: bus=0 devfn=0x09: vendor_id=0x8086 device_id=0x7010
region 4: 0x0000c000
PCI: bus=0 devfn=0x0b: vendor_id=0x8086 device_id=0x7113
PCI: bus=0 devfn=0x10: vendor_id=0x1013 device_id=0x00b8
region 0: 0xf0000000
region 1: 0xf2000000
region 6: 0xf2010000
PCI: bus=0 devfn=0x18: vendor_id=0x1af4 device_id=0x1000
region 0: 0x0000c020
region 1: 0xf2020000
region 6: 0xf2040000
PCI: bus=0 devfn=0x20: vendor_id=0x1af4 device_id=0x1001
region 0: 0x0000c040
region 1: 0xf2060000
Found 2 cpu(s) max supported 2 cpu(s)
MP table addr=0x000fdbe0 MPC table addr=0x000fdbf0 size=252
SMBIOS ptr=0x000fdbc0 table=0x7ffffec0
ACPI tables: RSDP=0x000fdb90 RSDT=0x7fffdbd0
Scan for VGA option rom
Running option rom at c000:0003
VGABios $Id$
Turning on vga text mode console
SeaBIOS (version 0.6.1.2-20110201_165504-titi)

Found 1 lpt ports
Found 1 serial ports
ATA controller 0 at 1f0/3f4/0 (irq 14 dev 9)
ATA controller 1 at 170/374/0 (irq 15 dev 9)
found virtio-blk at 0:4
ebda moved from 9fc00 to 9dc00
drive 0x000fdb40: PCHS=16383/16/63 translation=lba LCHS=1024/255/63 s=33554432
ata1-0: QEMU DVD-ROM ATAPI-4 DVD/CD
PS2 keyboard initialized
All threads complete.
Scan for option roms
Running option rom at c900:0003
pmm call arg1=1
pmm call arg1=0
pmm call arg1=1
pmm call arg1=0
Running option rom at ca00:0003
Returned 53248 bytes of ZoneHigh
e820 map has 7 items:
0: 0000000000000000 - 000000000009dc00 = 1
1: 000000000009dc00 - 00000000000a0000 = 2
2: 00000000000f0000 - 0000000000100000 = 2
3: 0000000000100000 - 000000007fffd000 = 1
4: 000000007fffd000 - 0000000080000000 = 2
5: 00000000feffc000 - 00000000ff000000 = 2
6: 00000000fffc0000 - 0000000100000000 = 2
enter handle_19:
NULL
Booting from DVD/CD...
Virtual machine is running. To access QEMU monitor press enter in console and set up the VNC password
(qemu) change vnc password
Password: **
(qemu)
Open your favourite browser and connect to VM's console through noVNC service by URL https://YOUR_HOST:6080/vnc.html:

You have configured and run virtual machine using qemu kvm! Proceed with further OS installation procedure.
When you at step of configuration the network interface, choose the DHCP as a method of getting IP address.

Note that we use paravirtualized driver (vioif0) have been configured when have started the machine.
When installation is compleated and VM can boot from virtual HDD, we can put cd-rom device out of command line to simplefy the command .
For accessing newly created VM from outside network use embedded ipforwarding feature as on example below:
root@dilos:~# smb-/smartdc/bin/qemu-system-x86_64 -enable-kvm -smp 2 -m 2048 -drive file=/dev/zvol/rdsk/rpool/kvm0,if=virtio,index=0,media=disk,boot=on,id=disk0 \
-vnc 0.0.0.0:0,password -monitor stdio \
-device virtio-net-pci,netdev=n1,mac=02:08:20:80:8e:d3 \
-netdev user,id=n1,net=192.168.11.0/24,hostfwd=tcp:127.0.0.1:2222-:22
Where:
hostfwd=tcp:127.0.0.1:2222-:22 - configure that port endpoint 127.0.0.1:2222 on the host will be forwarded to port 22 in the guest VM.
root@dilos:~# ssh root@localhost -p 2222
Password:
root@dilos-guest:~#
(qemu) info network
Devices not on any VLAN:
  n1: net=192.168.11.0, restricted=n peer=virtio-net-pci.0
  virtio-net-pci.0: model=virtio-net-pci,macaddr=02:08:20:80:8e:d3 peer=n1
(qemu) system_powerdown
(qemu)
Done!